
June 2017
This is the sixth edition of the Puppy Linux Newsletter. I must admit I thought it may have died a slow death before now but because of a few regular contributors, it has survived. I guess the next milestone is twelve months.
Last month I had a play with a software package called nuclear. It's a very nice music streaming application that lets you search, listen and download music online. Have a read about it in the software section.
I have mentioned before and probably will again, the status of Puppy distributions. The two official Puppies are slacko and tahrpup. This was decided some time back when Barry Kauler handed over the reins to 01micko. This has not stopped Barry from playing in the Puppy space, although ,as he himself says, his new adventures don't use the conventional Puppy structure. Barry is still very active in development and on the forum. He also actively keeps readers abreast of his progress on his blog.
The latest developments on slacko-700 b3 (both 32 and 64 bit) can be found on the forum.
This month I have created a new section called The labbe5 report. Labbe5, over quite some time, has provided many great resources that are applicable to Puppy. Some of the articles are information based while many are software related.
Enjoy
The Puppy Linux Discussion Forum is the main source for a lot of the information repeated here. Where appropriate, links will be provided so you can read first hand about the distro's development. This section will likely just provide highlights as a starting point.
- Puli 6.1.0
-
Puli was developed by gjuhasz
Link to Puli on the forums Changelog Download link.
Puli 6.1.0 is a member of the Puppy Linux family: a high security, "kiosk flavour" of 666philb's tahrpup 6.0.5, intended to boot from a USB pen drive and run safely even if the boot device is unplugged.
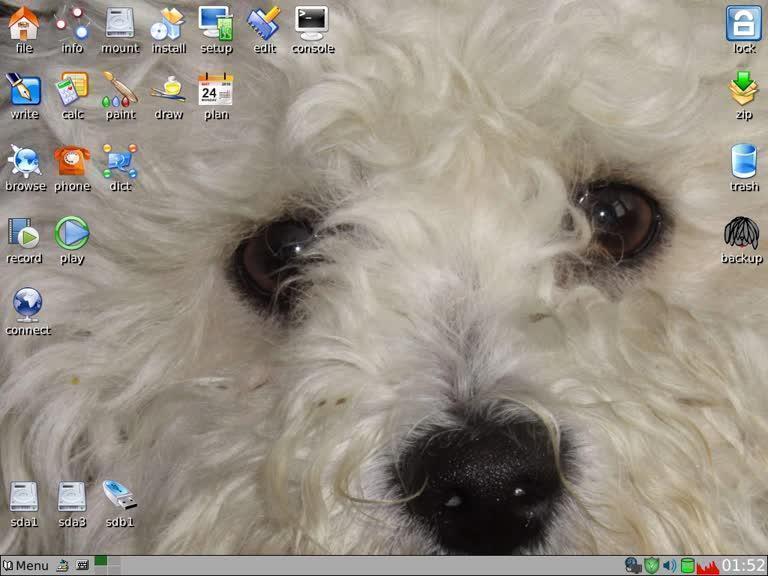
- Slacko-6.3.2 remaster by csipesz
-
Remastered distro by csipesz
Slacko 6.3.2 uefi 32 bit NoPAE - Csipesz Version (murga forums)
Hungarian forum-thread
Download it here or here.
Nuclear - Internet Music Player
BC - Command Line Calculator
- Nuclear
-
Written by smokey01
I learned about nuclear via a labbe5 post in the forum.
Nuclear is a beautifully designed Open Source multi-platform music streaming app that fetches media content from multiple online sources including YouTube and last.fm. The app has a simple yet glossy UI and does an excellent job at playing audio files.
Nuclear homepage
It appears Nuclear only comes as 64bit.
The app can be downloaded as a deb package, an Appimage, or from my own site, as an sfs.
nuclear-eddin-linux-x64.deb
nuclear-eddin-linux-x64.AppImage
nuclear-eddin-linux-x64-1.0-x86_64.sfs
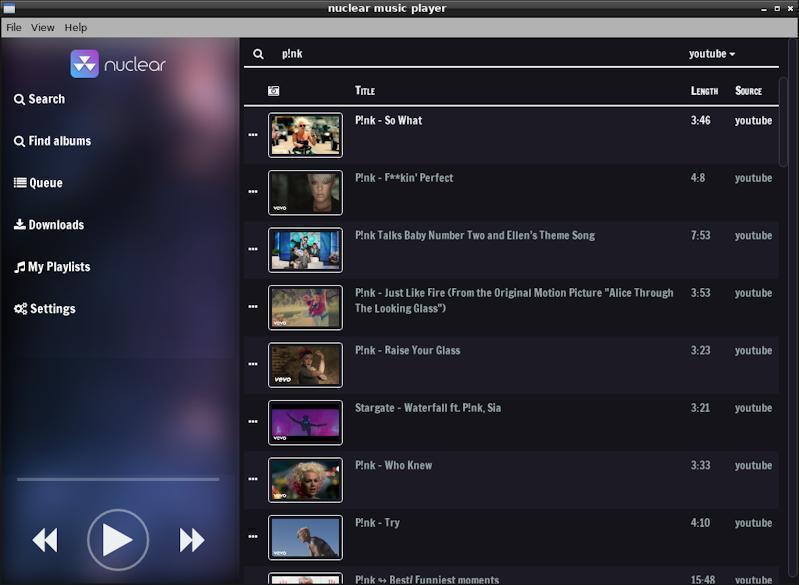
Clicking on the three small dots left of any pictured image provides additional options.
Enjoy
- The BC Programmable Calculator
-
The BC Programmable Calculator
by 6502coder
Bc has to be one of the most under-appreciated tools in the standard Linux toolbox. It is a command-line tool that implements a convenient programmable calculator, and has been around since the very earliest days of the UNIX OS. I find it much more convenient than a GUI-based calculator.
To start the calculator, just open a terminal session and type "bc". You'll get a brief banner message, after which the program sits there waiting for you to type something. In the following transcripts, I have highlighted the program's responses in yellow.
$ bc
bc 1.06.95
Copyright 1991-1994, 1997, 1998, 2000, 2004, 2006 Free Software Foundation, Inc.
This is free software with ABSOLUTELY NO WARRANTY.
For details type `warranty'.
Let's start with some examples that show that bc understands normal algebraic expressions.
2.2+4.1^3
71.1
9*(3+5)/4 # parentheses work as expected
18
355/113
3
Bc calculates to a number of decimal places determined by the number of decimal places in the input numbers and by a parameter called scale:
scale=9 # now calculations are done to 9 decimal places
355/113
3.141592920
sqrt(3) # sqrt is a built-in function
1.732050807
You can also define variables in bc:
top=355
bottom=113
top/bottom
3.141592920
And you can define your own functions, such as the Celsius-to-Fahrenheit conversion:
define c_to_f (c) {
return 9/5*c+32
}
c_to_f(20)
68.000000000
In fact bc is a complete programming language, with Boolean operators and control constructs such as if-else, for and while loops, etc.
To exit from bc, just type
quit
The "-q" option suppresses the opening "banner", and the "-l" option predefines a set of trig and log functions, and also presets the scale to 20.
$ bc -q -l
s(1) # sine of 1 radian
.84147098480789650665
By default bc uses base-10 arithmetic, but you can change this with the parameters ibase (input base) and obase (output base):
$ bc -q
obase=16 # print results in hex
ibase=16 # interpret typed input as hex
A+2
C
If the text file "foo" contains bc commands, then
$ bc foo
will run bc, taking its input from the file "foo", after which it will wait as usual for you to type additional input. This is a convenient way of setting up your own predefined variables and functions. To learn more about bc, google "man bc".
Written by smokey01
This month I want to mention forum user and Administrator, Flash. Flash joined the the Puppy Linux forums way back on the 05 May 2005. This means he has been an active user for over twelve years. At the time of writing this article he has posted 12,498 times.
Being an administrator on such a large forum can be very time consuming. He not only deals with administration tasks, he also acts as moderator. This means he is responsible to make sure people follow the forum rules and move posts and topics into the correct areas. On many occasions, especially recently, he has needed to delete many SPAM posts from unscrupulous people trying to flog their wares.
It's not unusual to have 25,000 to 30,000 users visit the forums over a 24 hour period.
Thanks Flash, keep up the good work.
This is a good section to discuss how to compile software. Compiling is not everyone's cup of tea but the more people that can manage it, the longer life Puppy will have.
The hardest part of compiling is the build recipe as there are so many options. Let's include some proven recipes here.
- SMplayer
-
Written by norgo
SMplayer is a great front end for Mplayer and MPV
It is very comfortable to use and contains really a lot of adjustment options.
.jpg)
SMplayer is opensource and to obtain from http://www.smplayer.info/ or PPM and Murga Linux forum of course.
When you run SMplayer the very first time have a look at following adjustments:
Choose here the right player or path to the player executable ( if player is located elsewhere ) and auto-detection failed )

The setting video output driver "default" works in the most cases.
In case of trouble select video output driver "x11" ( is slow but works almost always )
If you know what you do of course you can select a different driver.
If the used player has been compiled with VA-API and/or VDPAU support
SMplayer will detect this automatically and show this option too
.jpg)
The setting audio output driver "default" works in the most cases.
In case of trouble select "alsa".
.jpg)
If you are using software decoding and your computer has a multicore CPU you can choose the number of threads to use for decoding.
If player, GPU and graphics driver supports hardware decoding, you can activate the option hardware decoding.
.jpg)
If you want to watch the videos in full video resolution, select "whenever it's needed".
Otherwise video becomes scaled to the SMplayer window size.
.jpg)
There are still a lot of further adjustment options but too much to explain all here.
Feel free to play around with them.
Adjustments are stored in ~/.config/smplayer
How to compile SMplayer from source
1. load the "devx_distro_version.sfs" of your distribution
2. install the desired qt version you want to compile SMplayer for
In case of SMplayer for shared qt libs there is no problem, via PPM offered qt PET's are the right one.
If you want to compile a statically version of SMplayer you will need a statically compiled version of your desired qt version for compilation.
3. create a new directory for building
4. change into the new directory
5. download and extract the source package into the build directory
# mkdir build
# cd build
# ls
# smplayer-17.5.0
6. create a new directory ( a good idea is to use the name of the PET you want to create , application-version-architecture )
# mkdir smplayer-17.5.0-i686
7. change into source folder
# cd smplayer-17.5.0
8. by default SMplayer will be installed in /usr/local
because we want to install in /usr instead we have to use PREFIX
furthermore we want to install into our created folder, for this we have to use DESTDIR
9. our command line for compilation of this example
# make PREFIX=/usr DESTDIR=/root/build/smplayer-17.5.0-i686 install
10. when everything went good you have SMplayer compiled and installed directly into your "application-version-architecture" folder
Now have a look at the smplayer.desktop file
replace:
Categories=Qt;KDE;AudioVideo;Player;Video; (by) Categories=X-Multimedia-mediaplayer
Icon=smplayer (by) Icon=/usr/share/icons/hicolor/scalable/apps/smplayer.svg
11. if desktop file has been edited you can create your PET using dir2pet script
That's all
Good luck!
This month we have a nice script from vovchik.
- text2svg
-
Script provided by vovchik
There have been a couple of these in the past but this one is very good.
It doesn't convert images but it does some very nice effects on text.
SVG/PNG Fancy Text and Logo Generator
Tips & Tricks are simple little actions you can take to make your life easier when using Puppy. You will probably know most of the tips but there are always new users that don't.
Samsung printer Information via SyncThru Web Services.
I think the SyncThru system is only for Samsung printers. Please let me know if this system works with other brands of printers.
- Printer information
-
Written by smokey01
Recently I was trying to find some software that would show me the level of my printer toner levels. I have a Samsung C1860FW colour laser printer which was reasonably priced and performs very well. After about an hour of web surfing I discovered SyncThru Web Services. What a great find this was.
I have my printer connected via a USB port and also configured on my local network at http://192.168.0.9. In actual fact, there is no requirement to have the USB connection as all of my devices in the house are connected to the local network. This means these local devices can all print to the printer. My wife thinks this is pretty cool and gives the printer quite a work out.
To inspect your networked Samsung printer, turn the printer on and simply type the printer address/URL in your browser.
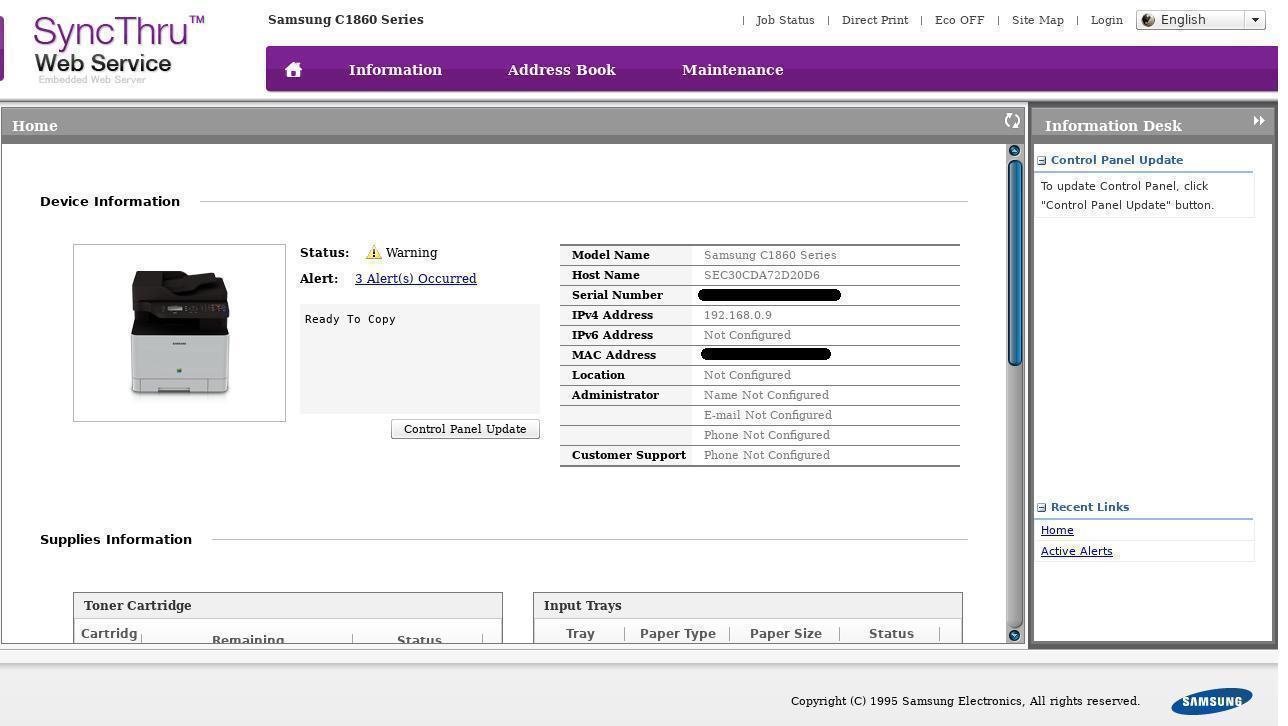
Sorry for the large image but it's too hard to read it at 800x600.
Now here is a screen shot of the ink levels. Select the Information tab then Supplies on the left menu.
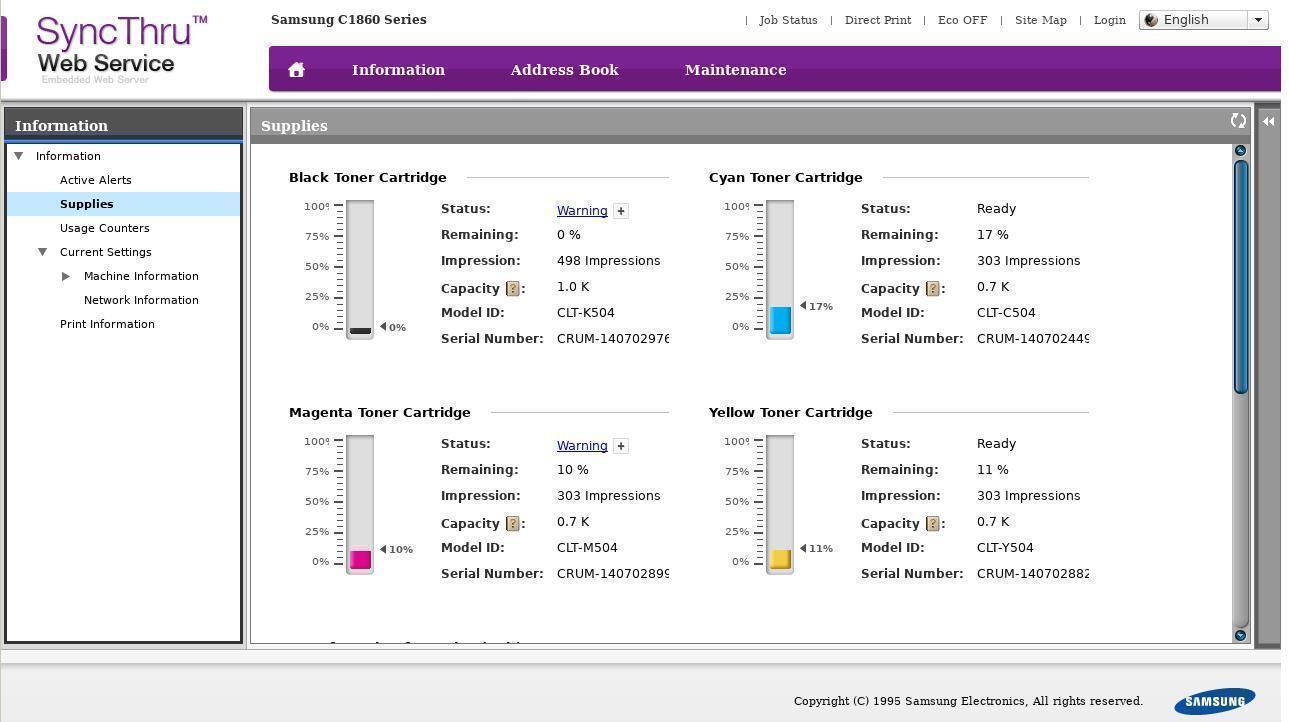
It can provide much more information but this satisfied my requirement.
- System Information
-
Written by smokey01
Quite often it's nice to be able to interrogate your computer to discover what components are installed. If it's your computer, you probably already know but when you are helping someone else out on their computer, it may not be as obvious.
Most Puppy Linux distributions come with a bunch of tools to provide this information such as:
Hardinfo,
dmidecode,
lspci,
lsusb, and
PupSysinfo by radky.


Typing any of the above commands in a terminal will provide you with all sorts of information. To get a list of available options of each application, type it's name -h or --help, EG: dmidecode -h.
Inxi is another information gathering tool that is very useful. Unfortunately it may not be included in your Puppy. If you double click on the link it will take you to the web site where you can download it. Click on the green button that says Clone or download then click on Download ZIP.
Inxi is a script so it will work on both 32 and 64bit systems. Just copy the script to one of your bins. I suggest /usr/local/bin.
If you type inxi -Fxx in a terminal you should see the following output in the terminal.
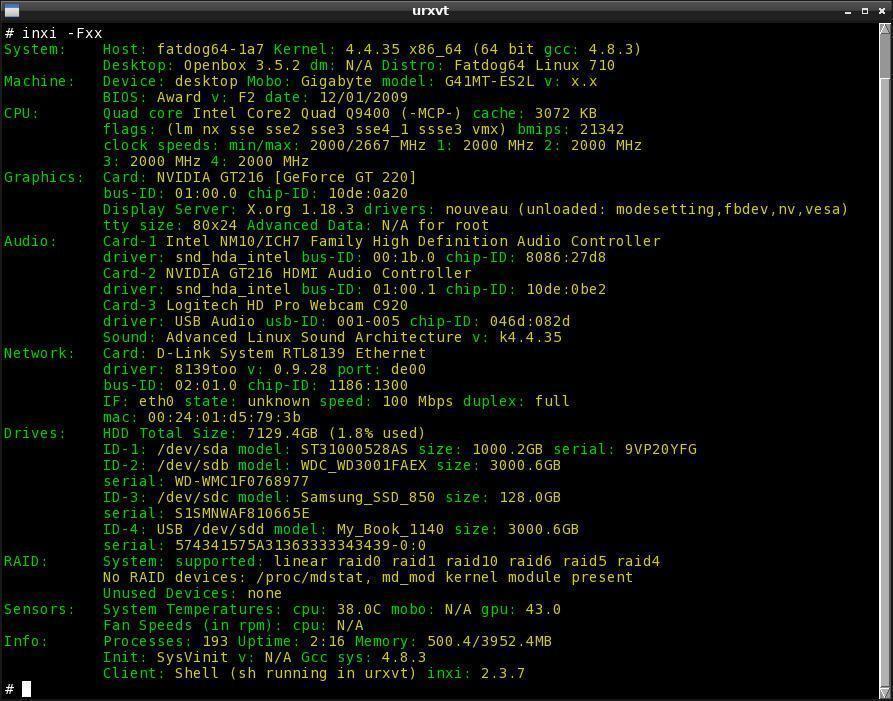
You probably didn't get colours but that can be fixed by creating a config file: /etc/inxi.conf
Inside the file type:
DEFAULT_COLOR_SCHEME=18
Much more information on the configuration file can be found here.
Tutorials this month:
Save options - Hopefully a bit of clarity on which save format to choose.
USB boot Puppy - Boot Puppy on a hard drive from a USB flash drive.
Format a Drive - Format a drive using GParted.
Legacy - GRUB
- Save options
-
Written by smokey01
One of the first tasks you will encounter when you first try Puppy is saving your settings on initial shutdown. There are three different methods of doing this.
1. A save file is the most common way and generally considered the default. (All data is saved to a single file)
2. A full installation. (The installation consumes the entire partition)
3. A save directory. (Similar to a full installation but the file system is contained within a single directory)
Although this topic has been discussed many times, it's one that keeps popping up as Puppy is discovered by newcomers.
The table below provides the differences between the three methods.

Space - Is the amount of user space. IOW it's the local space within the OS such as /root and /my-documents. It is recommended you save large amounts of data outside of the local file system to an external drive.
Portability - How easy it is to move the OS between different media.
Backup - The ease of backing up the OS and/or your data.
File System - The type of file system that can be used.
SFS File - Can Squash File System files be used.
Boot time - How long to boot the OS to a desktop.
Save Time - Time to save data and shut down.
Convenience - Is it easy to use and manage.
- USB boot Puppy
-
Written by smokey01
Allow me to put this in perspective.
Once upon a time a friend of mine said he would like to have a look at Puppy but he didn't want it to affect his current Windows installation. If I provided Puppy on a CD/DVD or USB, the experience is not great as these types of media are slow to boot from.
One has to be careful not to trash the Windows boot manager so installing it to the hard drive is risky. It is possible to use grub4dos and this will create a menu for Windows and Puppy alike. However this does not give much confidence to Windows users.
My solution is to make a bootable USB flash drive that loads Puppy from the Hard Drive. This method provides a faster boot time with no risk of damaging the windows boot manager.
This process is divided into two parts and assumes you are running Puppy.
1. Copy the Puppy files onto the hard drive, and
2. Make a bootable flash drive.
Part 1.
For this exercise we are going to use slacko-6.3.2 (32bit)
Download slacko-6.3.2
Using your file manager (Rox), make a directory called slacko-6.3.2 on your target hard drive.
Copy the slacko-6.3.2-uefi.iso file into the directory you just created.
Click on file. This will mount the ISO file so you can see the contents.
Now copy (drag and drop) the four files below into the slacko-6.3.2 directory along side the slacko-6.3.2-uefi.iso file.
initrd.gz
puppy_slacko_6.3.2.sfs
vmlinuz
zdrv_slacko_6.3.2.sfs
Once the copying is complete, click on the slacko-6.3.2-uefi.iso file again, this will unmount it.
If you wish, you may delete the slacko-6.3.2-uefi.iso file as it's no longer required. I would keep it, you never know when you might need it again.
Part 1 is now complete.
Part 2.
Select a USB flash drive. It doesn't need to be very big or fast. A USB 2.0 will do fine. It's always a good idea to start with a freshly formatted USB drive. Format to fat32 and set the boot flag. How to format a USB flash drive.
For this exercise we are going to use a modified Legacy GRUB. The modifications were applied by CatDude which add a few bells & whistles like being able to use higher resolution splash screens.
Download CatDude's GRUB Read about it here.
Now you have two options. You can either install the grub-gfxboot_0.97-36mepis1.pet file which will overwrite your existing grub files or just extract the three files you need.
On the flash drive, make a folder named boot and a subfolder in boot named grub.
In your main OS go to /usr/lib/grub/i386-pc and locate the two files stage1 and stage2. Copy them to the /boot/grub folder you just made.
In the same folder create a file and name it menu.lst with the following content:
title Slacko-6.3.2
root (hd1,0)
kernel /slacko-6.3.2/vmlinuz psubdir=slacko-6.3.2 pmedia=atahd pfix=fsck PDEV1=sdb1
initrd /slacko-6.3.2/initrd.gz
Open a terminal, at the command prompt type grub. This launches the GRUB emulator. At the > prompt, type find /boot/grub/stage1. Grub will search for the files you created above and will probably locate them at (hd1,0).
WARNING
You have to be a little careful with this step as you don't want to trash your existing boot manager on your HDD. To make sure you have located the correct drive add a unique filename (billybunter) to the /boot/grub directory on the flash drive and search for that. EG:
find /boot/grub/billybunter.
While still at the GRUB prompt, type these three commands in the following order:
root (hd1,0) (or whatever drive GRUB reported above)
setup (hd1)
quit
Unmount the flash drive and reboot.
You need to instruct your computer to boot from the flash drive. This is normally done in the BIOS. To enter the BIOS depends on your computer. Some use the Del key, others use F2 or F12.
- Format a Drive
-
Written by smokey01
It may be necessary to format, or reformat a drive whether it's a SSD, HDD or a Flash Drive. This function is normally performed with Gparted. I think most Pups have Gparted under the System Menu entry. The partition should not be mounted for this operation.
This is an excellent tutorial on GParted.
Fire up GParted and you should see something like this:
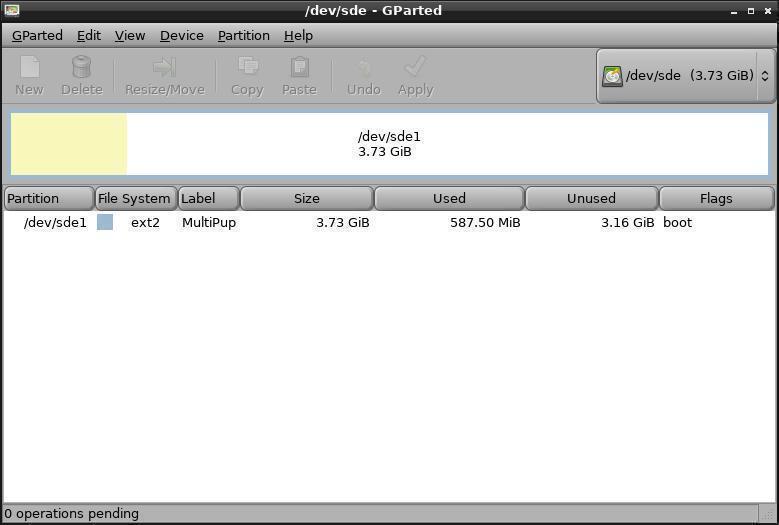
I have selected my flash drive which in my case is sde. Yours may be different. Drives can be selected in the top right corner of the dialog. Make sure you select the correct drive otherwise you will destroy all of your data on the selected drive.
As we are reformating the partition, there is no need to delete and re-create again.
Highlight the drive, Select Partition, Format to, then fat32. Click on Apply. When it asks "Are you sure you want to apply the pending operations?", make sure you have selected the correct drive and click Apply.
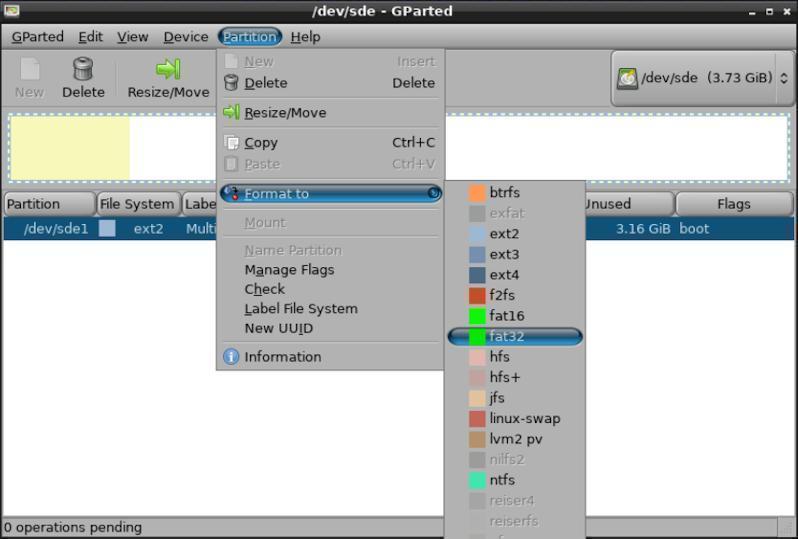
Now select partition again, Click on Manage Flags and tick boot, if not already ticked. Clicking on the boot tick when already ticked will remove the boot flag, so you don't want to do that.
Close GParted.
- Legacy GRUB
-
Written by smokey01
There are many Operating Systems (OS) available for Personal Computers (PC) but they are of no use unless you can boot them. This is where the GRand Unified Bootloader (GRUB) comes in handy.
There are many other bootloaders as well, such as GRUB2, Grub4Dos and Lilo just to mention a few. In this tutorial I’m only going to be talking about Legacy GRUB Version 0.97. This version has been modified so it can boot gfxmenu images which have higher resolution images with more colours than the conventional splash image.
Before I delve into the installation of GRUB, I need to explain some very important information about drive identifiers. The drives could be Hard Disk Drives (HDD), Solid State Drive (SSD), USB HDD, or Flash Drives. For the moment I will assume you have a computer with a single HDD with four partitions on it. When you boot Puppy you would see the four drives on your desktop identified as sda1, sda2, sda3, and sda4. This is the way the newer kernels display drives. Earlier kernels and Legacy GRUB identify the same drives as (hd0,0), (hd0,1), (hd0,2), and (hd0,3). Can you see a pattern emerging?
In case you hadn’t noticed the pattern, have a close look at the table below.
(hd0,0) = sda1 First partition on the first physical HDD
(hd0,1) = sda2 Second partition on the first physical HDD
(hd0,2) = sda3 Third partition on the first physical HDD
(hd0,3) = sda4 Fourth partition on the first physical HDD
As GRUB is quite old it uses the older (hd0,0) standard and the newer kernels use sda1 so it’s important to understand both standards if you are going to use Legacy GRUB on modern operating systems.
Here’s a little tester. What would the third partition on physical drive number two be identified as? If you answered (hd1,2) or sdb3 you would be correct.
The reason I use terms like physical drive is because logical drives are also known as partitions.
It is considered normal to install GRUB to the first partition of the first physical drive, (hd0,0). Having said that, it can be installed on your second, third or any other partition on your first physical drive. It can even be installed to any other physical drive and partition. Whatever drive and partition you install GRUB to, it sees itself as (hd0,0). This is why installing GRUB on the first physical drive and first partition make good sense. It's easier to understand.
Up to now it’s been pretty easy. From now on it gets a little more confusing. Lets assume you want to install GRUB to (hd0,3). Although GRUB is on the fourth partition of the first physical drive it still sees itself as (hd0,0) as described above. Now you might say to yourself, self, why is this important? Ah, I’m glad you asked. In the menu.lst file, the GRUB configuration file, is a line like: root (hd0,0). This actually tells GRUB on which drive and partition to look for the OS files. If you get this wrong then GRUB won’t be able to find the OS.
I hear you ask “but how does GRUB know what drive to look on for the menu.lst file”. That’s done when you install/setup GRUB, more about that here.
The biggest limitation with Legacy GRUB is the 2TB drive limit. If you have a HDD that is larger than 2TB then it can’t be used. Dividing the drive into partitions smaller that 2TB does not fix the problem, sorry. Although HDD greater than 2TB are plentiful, the average desktop and laptop generally come with drives smaller than 2TB. If you have an SSD then it is even more likely your drive will be less that 2TB as they are still quite expensive.
To get the best performance, put your OS files on the SSD and save your data to a conventional HDD.
Let’s look at a very typical PC or even laptop storage configuration. The first drive being about a 128GB SSD drive and the second a 1TB HDD. I wouldn't even bother partitioning a 128GB SSD. For Legacy GRUB this would become (hd0,0). Lets assume the 1TB HDD has two partitions, (hd1,0) and (hd1,1).
Important.
If your GRUB is on (hd0,0) and you are booting from a HDD or SDD internal drive then drive identifiers make reasonable sense. GRUB is on (hd0,0) and it’s looking for Operating Systems on (hd0,0) that’s where you should put them.
If GRUB is on your second physical drive (hd1,0) then it becomes a little more complicated. Remember GRUB always likes to be called (hd0,0), so if you place it on (hd1,0) how does it load an OS on (hd0,0) where your OS are? You can’t tell it to look on (hd0,0) because the OS is not there. Because these are fixed or internal drives, GRUB takes the (hd0,0) identifier and the other drives are incremented by 1. In this case your first physical drive is actually seen by GRUB as (hd1,0) although it’s really drive (hd0,0).
If you always put GRUB on your first physical drive and first partition, life is definitely much easier. If you have an SSD and a HDD then make the SSD your first drive.
GRUB installed to a USB flash drive identifies SDD and HDD a little differently. It doesn’t matter where you install GRUB, it sees itself as (hd0,0) as discussed previously.
When GRUB boots from a USB flash drive it reassigns high to low, not low to high like a fixed drive installation of GRUB. Makes your head spin doesn’t it?
Lets assume you have three drives, (hd0,0)=SSD, (hd1,0)=HDD, (hd2,0)=HDD.
We install GRUB on HDD (hd1,0). GRUB now sees (hd1,0) as (hd0,0), the real (hd0,0) becomes (hd1,0) and (hd2,0) remain (hd2,0).
When we plug in a USB flash drive with GRUB installed on it, we now have four drives. Looking at the desktop you will notice the flash drive should be sdd1, in other words the fourth drive or (hd3,0) in retro and GRUB speak. Because a USB flash drive is removable the reassignment of drives is different. Now the flash drive becomes (hd0,0), nothing unusual there, (hd2,0) the third physical drive becomes (hd1,0), (hd1,0) becomes (hd2,0) and (hd0,0) becomes (hd3,0).
These reassignments are all relative to booting GRUB, nothing to do with desktop drive identifiers.
Once you can get your head around these principles, GRUB is actually quite easy to install and use.
Remember the 2TB Limit.
The June crossword by greengeek.
- Crossword
-
Puppy Crossword (June)
(Formatted by greengeek using the "Puzzlefast" website)
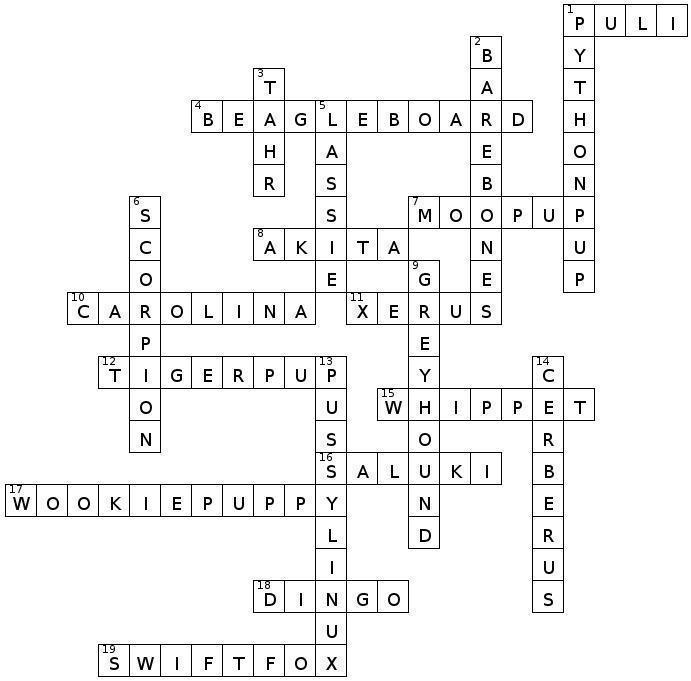
This month I have focused on "animal" related words - mostly "dog breed" titles of puplets
but with a few extras thrown in for good measure. Happy hunting!
(See clues below image)


Scroll further down for answers:

Forum user labbe5 shares many of his great finds on the Puppy Linux Forums. I'm not sure if these go unnoticed but I decided to share some of them here. Although many of these links refer to other operating systems they do work in many flavours of Puppy.
redshift and redshift.conf
Namehelp
wallpaper set
Namebench
ddrescue
Firefox and hardware acceleration
Do My Command utility
Cadence
Adguard DNS
DNS.Watch
News Feed with RSSOwl
i3 Window Manager
abcde - rip cds to mp3 or ogg from the terminal
Juice Jacking
Introduction to Linux
a linux-friendly DAC for listening to high-fidelity music
uApp Explorer website for exploring snap packages
Anbox - Androïd apps on a regular Linux system
NO_PUBKEY
VPN Comparison Chart
setting up persistence Porteus-boot in Xenialdog
PhotoCollageForge
Mastodon
blocklist for Transmission
mouse freeze
Minimal Linux Live
more on smartctl
lesser known browsers and why avoiding some of them
more on MakeMKV
Virtualbox and USB devices
write texts in terminal with cat
MakeMKV DVD (and maybe Blu-Ray) Ripper
Potamus
"history" - shows commands used in terminal
Rambox
Privacy Settings
ExMplayer
The Linux Command Line
CryptoGo
Fatdog64-710 Final
ifconfig
task
sam2p
youtube-dl
gsmartcontrol
chattr
Stacer
Nuclear
Firejail
DNS leaks
VLC 360° videos
coreboot
AT&T unveils its TV streaming service DirecTV Now
How Images Can Infect Your Computer through Social Media
Puppy Linux Forums USA
Ibiblio repository USA
nluug repository Netherlands
Internode repository Australia
University of Crete repository Greece
aarnet repository Australia
Internet archive repository USA
Puppy Linux Tips by smokey01
Puppy Linux wikka Puppy sites
Bookmarkos provided by kerl
Search the Puppy Linux Forums
Barry Kauler's News Blog
Not all of the people below have physically given me the information to publish. If I find information I will give the credit where it is due. So if you see your names on this list below please don't be alarmed or upset. You are not losing your mind.
smokey01
gjuhasz
csipesz
vovchik
labbe5
norgo
6502coder
greengeek
Proof reading - russoodle +1
Display tip:
To improve the Notecase display format please press F7 then:
- Tick the "Restore last position/size" checkbox.
- Select the "Display" tab and tick "Wrap text".
Contributions
If you have information you would like to see in the newsletter please email it to smokey01 at smokey01@internode.on.net. It must be created in Notecase otherwise it makes my job far too difficult. I don't intend doing any significant editing but I will attempt to read all of the articles and ask a couple of others to do some proof reading. If you would like to assist in proof reading please let me know on the email address above.
Notecase is very easy to learn and use. Try and keep your articles to less than 1000 words. Photos and images should be no bigger than 1024 x 768. I can always make them smaller.
The deadline for articles is the 20th of each month. Let's not worry about time zones. I know it may be the 20th in Australia and only the 19th in the USA but I can live with this. If it's more than 24 hours late with respect to Australian CST then your article may be pushed right, into the next edition. I expect proof reading to take less than a week which will provide about four days to publish at the beginning of each month.
I will upload the Newsletter to my site at http://smokey01.com/newsletters. There will be two versions. One will be an xz compressed Notecase file and the other will be a html file so it can be read in a browser.
I have changed the original naming convention to 0001-PuppyLinuxNewsletter-Jan2017.ncd.xz and 0001-PuppyLinuxNewsletter-Jan2017.html respectively. The formatting of the html is not brilliant but readable. The newsletter is intended to be downloaded and read in Notecase.
Disclaimer
The editor has the right to veto any articles that he/she considers inappropriate. A reasonable effort will be made to avoid spelling and grammatical errors however, I'm sure some may slip through. This newsletter is published by volunteers, and is free, so please be kind. Constructive criticism is acceptable.
smokey01