
July 2018
During the last month I have been quite busy compiling Linux kernels and building distros in woof-ce. It's been a lot of fun and I have learned quite a bit whilst doing so. If you are interested in the kernel I built it can be found at http://smokey01.com/huge_kernel/4.17.0/
I also built an nvidia graphics driver as well which is in the same location. This was all compiled in slacko-6.9.9.9. I heard a whisper that the final version of slacko-7.0 may be released soon, maybe before you even read this.
Having built a nice new slacko-6.9.9.9 in woof-ce I thought it would be nice to pimp it a bit. I changed the wallpaper, added a menu bar at the top of the screen and changed the icon-set. Nothing too serious but it does look quite nice. I also added the latest stable kernel, 4.17.0. Apparently this version has some nice new features like power saving, so I've been told anyway.
I encountered a bit of a problem when looking for icon sets. Many of the sources I often used have disappeared which is a bit of a shame, but it happens. To fix this problem I spent quite a bit of time going through the forum looking for icon sets. I also managed to recover quite a few sets from defunct websites using the wayback machine. I wrote about the wayback machine in the September 2017 newsletter. Anyway you can now find a collection of over 100 icon sets on http://smokey01.com/icon-sets. Simply scroll down until you find the one you like and click on it to download the set. I never made any of the sets so hopefully they will work.
I just stumbled across Mega cloud storage. I have no idea what it's like but if you're looking for 50GB of free storage, it might be what you're looking for. I haven't tried it and I have no affiliation with them.
In the software section this month I have written about SFR's UExtract. It's a brilliant piece of software that I'm sure you will find useful. He also has developed a companion to it called Packit. Packit is for making archives rather than extracting them.
In the tutorial section you will learn how to turn VLC into a Television. Also in this section Terry Schuster has written a very informative tutorial about Samba, the networking software.
smokey01
The Puppy Linux Discussion Forum is the main source for a lot of the information repeated here. Where appropriate, links will be provided so you can read first hand about the distribution development. This section will likely just provide highlights as a starting point.
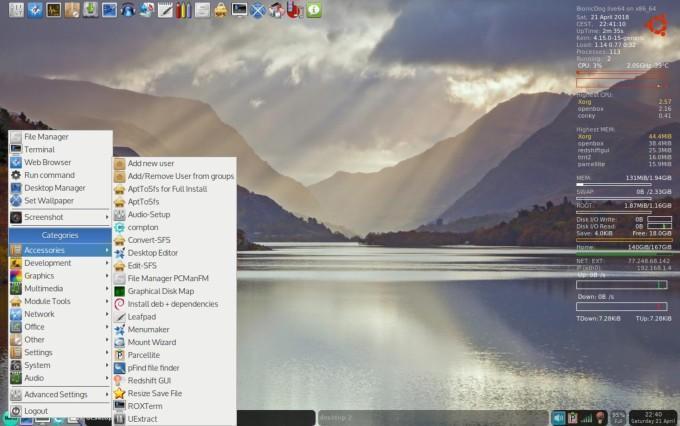
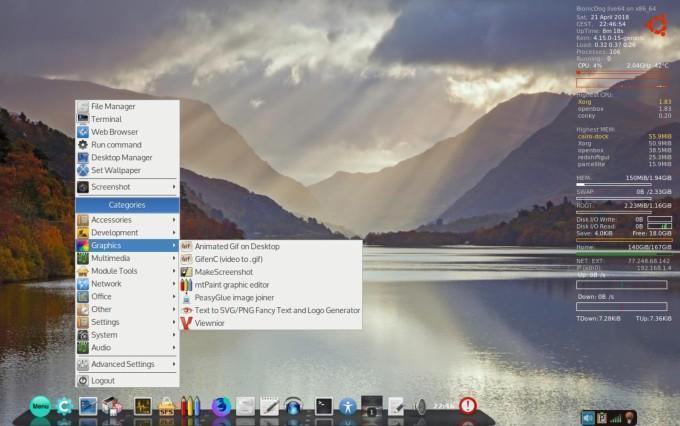
BionicDog - fredx181
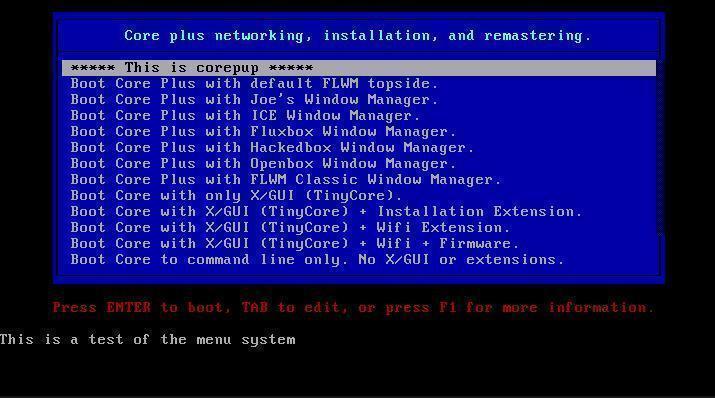
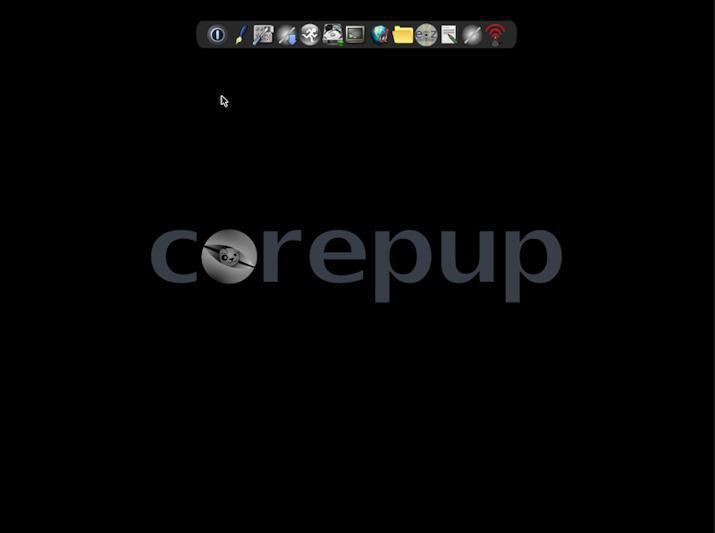
Corepup - wanderer
- BionicDog
-
BionicDog developed by fredx181
Read about it in the Puppy Linux Forums
- Corepup
-
Corepup developed by forum member wanderer
Read about it on the Puppy Linux Forums
Download ISO
UExtract - A brilliant archive extractor.
- UExtract
-
Written by smokey01
Have you ever been in a situation when you wanted to unpack an archive and couldn't because you didn't have the appropriate software?
There are literally dozens, if not hundreds, of different archiving formats so it's difficult to cater for them all. This is where forum member SFR has gone a long way to solving this problem.
Read more about it on the forum. Download it here.
Back in August 2013 SFR released an application called UExtract. As you can see it's not new but I'm sure there are many people who are not aware of this marvellous piece of software. It has been designed as A RoxApp. This means it integrates into the Roxfiler (filemanger) menu system. For example: Right-mouse click on an archive you wish to extract, choose the UExtract option, Left-mouse click then click OK. This will extract the archive into the current directory along side the original archived file. The archive will be extracted to a directory with the same name as the archive but .extracted will be appended to prevent overwriting existing files.
If UExtract does not open one of your archived files it's probably because you don't have the appropriate archive tool installed.
Before you ask, how do I know what archiving tools are included in my Operating System?, SFR has taken care of this as well.
After you have installed UExtract, use Rox to navigate to the /usr/local/apps directory.
Now Right-mouse click on the UExtract icon and you should see a menu similar to this:
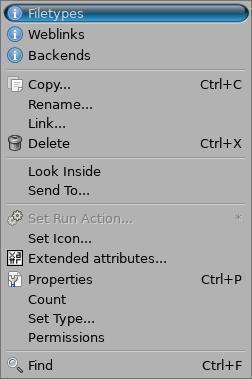
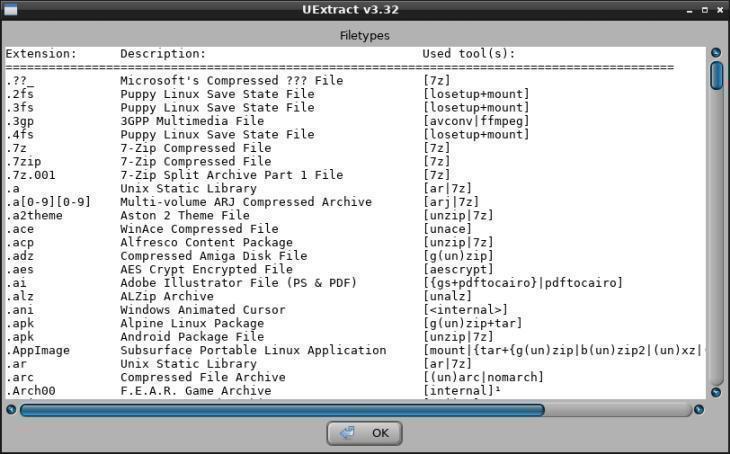
Filetypes will give you a list of filetype extensions, a description of the extension and what tool unpacks it.
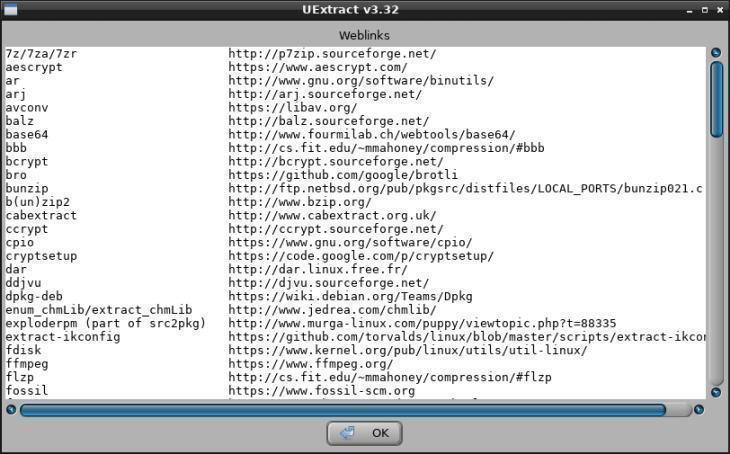
Weblinks provides a link to the source so you can download the missing tools.
Backends will show you what tools are missing.
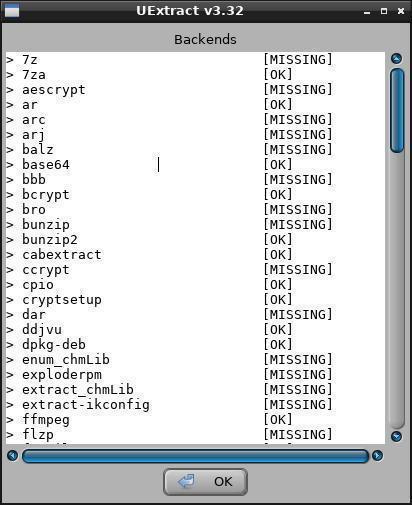
I don't know about you but I think this is very impressive and complete.
I use UExtract almost everyday. It's one of the first applications I install in a new distro, if it doesn't already exist.
If you use a distro that does not have Rox, don't despair, UExtract can be run from the command line like this:
uextract -o /root/somedir archive.tar.gz arch2.7z somepkg.rpm
How to watch TV in VLC
- Watch TV in VLC
-
Written by smokey01
Back in February 2017 I provided an article on how to compile VLC. The instructions were provided by Billtoo. For those who may not be aware VLC is a brilliant Media Player provided by VideoLan. It's available on Linux, Windows, Apple and Android.
In can play pretty much any media format you throw at it. In the latest versions it can even stream media content to chromecast devices.
One of the functions I really like about VLC, and it's been able to do this for some time, is play Television. Yes, you heard correctly. All you need to do is purchase a TV tuner and create a channels.conf file. The easiest way to create the channel.conf file that I have found is with a bit of software call w_scan. This month I have included w_scan in the compiling section.
VLC should be available in most repositories, maybe not the latest version but I'm sure one that will play TV.
There are many USB TV tuners available so it shouldn't be too hard to get your hands on one.
The one I bought cost me about $AUD10 on ebay similar to this.
First you need to get a copy of w_scan or download the source and compile it.
To create a channels.conf file using w_scan do the following:
1. Make sure you have a copy of w_scan in one of your bins EG: /usr/local/bin
2. Open a terminal.
3. In the terminal type: w_scan -c AU -M >> channels.conf
The above command will create a file suitable for the area you live in within Australia.
4. Place the channels.conf somewhere where it can be accessed. Let's just put it in /root.
5. Now you need to create a script so VLC can load the file and display TV.
#!/bin/sh
vlc --playlist-autostart /root/channels.conf
Now when you click on the above script VLC will load and display the first TV channel in your list. It may take a few seconds to start so be patient. To change channels either right mouse click on VLC, choose Playlist then select channel or go to menu item View and select Playlist and choose the channel you want. The short cut key is CTRL+l. You do need to double click to select a channel.
It doesn't have an Electronic Program Guide (EPG) but you can find out what program is being viewed by clicking on Tools and selecting Program Guide. For each channel you view there should be an entry.
Enjoy
- SAMBA Article
-
Written by Terry Schuster
Samba For Beginners
Operational for TahPup 605, and LXPup using SAMBA vs 2.7
SAMBA is a very effective and simple way to transfer files from one computer to another over a LAN, eg a home network, and all necessary SAMBA apps are included with more recent Puppy OS. SAMBA relieves the effort of transferring files between different computers via a USB and is also a more speedy and elegant process. It also means one does not need to replicate software on computers. For example, I occasionally use MSPaint to edit photos, running under WINE on a second computer. I transfer the file(s) from the main computer via SAMBA. Once edited, they are copied back to the original computer via the same SAMBA share folder. I have also used SAMBA to link my Puppy OS with Windows XP running in a Virtual Box on another computer running Puppy OS.
However, a beginner can be overwhelmed by the task of working out how to use SAMBA in Puppy Linux when there seems to be little documentation for beginners, apart from one forum dedicated to Slacko (Ref #4). Even the SAMBA GUI does not really give much information to beginners, and it may be a hit and miss affair to get things to work.
One gets the impressions from the forums that earlier implementations of SAMBA in Puppy Linux were fraught with issues. Later versions of Puppy Linux have a well developed and largely foolproof set of GUI apps to create and access shared files using SAMBA, facilitated via the YASSM packages. Once in the know, it is a relatively simple and effective process, and so it is hoped that this article may help and encourage beginners to experiment with SAMBA.
To keep things simple, and for the purpose of this article I will consider Puppy Linux to be the HOST OS, which is then accessed by another computer as GUEST which runs a similar version of Puppy Linux. While others OSes can be used as HOST, the setup can be different (see note 3).
Once setup, the shared files from the host computer behave as if they were present on the guest computer. Either Guest or Host can add files to the share-folder and changes will immediately be reflected in the other computer.
In this manner we end up with a two-way sharing of files. But note, both computers need SAMBA to be turned on, while only one of the sharing computers can mount shares at a time. In general, either computer can be used as a HOST, although using Puppy as a Host is a preferred option as it is so easy to set up.
Be advised that SAMBA version 2.7 was used for this article and there are later variants which may be preferable.
1) Setup SAMBA in the HOST Computer
Configure Samba by running the management application -
In Tahrpup 605 use: Menu → Network → SAMBA SIMPLE MANAGEMENT
There should be a red SAMBA OFF button indicating that SAMBA is off.
Clicking on this will change it to GREEN. But do this later after editing shares.
Note down the name of the following parameters: ID, Password and Workgroup.
The defaults are likely to be root, woofwoof and workgroup respectively.
These can be left unchanged for now.
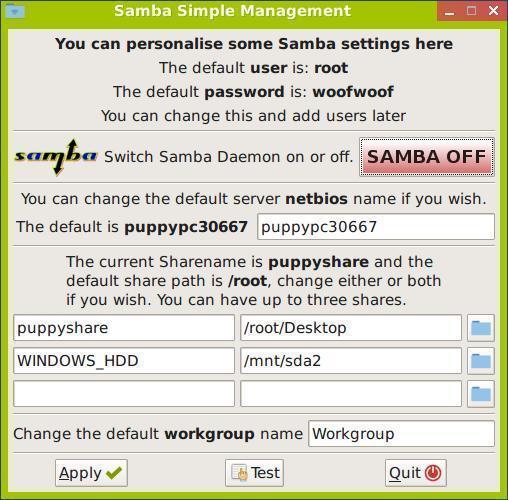
Edit the name of the computer to one which is recognizable by the GUEST. (Optional).
The default name will be similar to puppypc30667.
Edit the name of the share which can be recognized by the GUEST – the default is puppyshare.
Edit the pathway to the directory required, or leave as default or /root.
Test the configuration by clicking on TEST :
A window should open which includes the new share details as seen below.
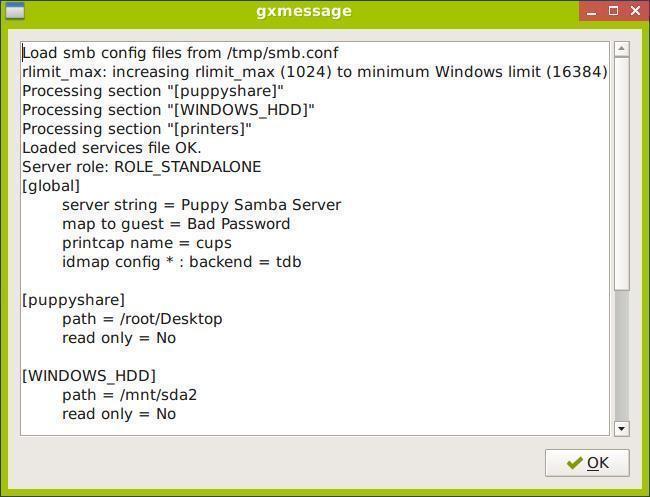
Explanatory additions are on the right:
[puppyshare] # first share name: puppyshare (default)
path = /root/Desktop # path to the ~/Desktop directory of the HOST Puppy OS
read only = No # read and write privileges enabled for guest and host
Add a second or third share if required.
Click on the folder icon and navigate to the required directory. Close to save.
This could include any reasonable file path on your computer, including any other mounted drives.
Test the configuration by clicking on TEST, which should include additional share details as seen below.
[Downloads] # second share name: Downloads
path = /mnt/sda2 # the root directory of a windows OS file system on HDD sda2
read only = No # read and write privileges enabled for guest and host
Click on APPLY to confirm the share additions
Toggle the SAMBA OFF button so the button is green, indicating SAMBA (is) now ON
The SAMBA setup is now complete and can be accessed by other computers on your LAN. If working with a frugal Puppy installation save all changes immediately or on shutdown.
Note:
i) The client computer can navigate into daughter directory levels, but not into parent directories, if they exist.
ii) There may be a necessity to turn off the Firewall of the Host, in my experience.
2) Access as Guest by Second Computer running Puppy Linux OS
Access SAMBA: Menu → Network → YASSM Samba Share LOGIN
Turn on SAMBA: by clicking on the RED SAMBA icon, which should turn green.
To find shares: select Menu → Network → Network → YASSM Samba Share Search
( NOT YASSM Samba Share SELECT if present )

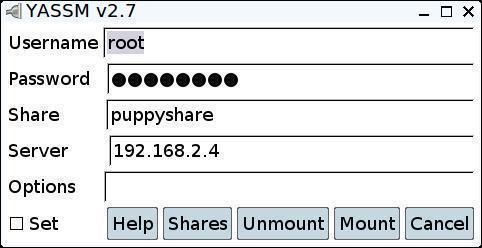
Note that each computer share has its own name.
Select the share to continue to a new GUI.
Select MOUNT to see the file structure on the remote computer
Files can be transferred either way – copied in/out of the shared directory on either computer.
Once a SAMBA share is mounted in the Guest computer and the Samba GUI window is closed, one can access the share by Menu → YASSM Samba Share Search. Use the pull-down menu to find the share required.
Click on SELECT - in this case I have selected puppyshare@puppypc30667. A new window will then appear. Click on MOUNT button to mount the share.
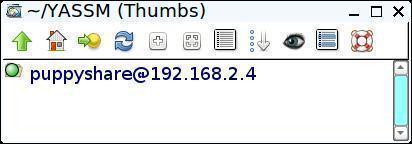
Then use the SHOW button to expose the share IPs – eg puppyshare@192.168.2.4
Click on it to open, which should show the share file contents, which in the example is the Desktop of the Host computer. These files can now be accessed as if they were resident on the Guest computer. It is even possible to run executable programs in the Guest computer which were resident on the Host computer.
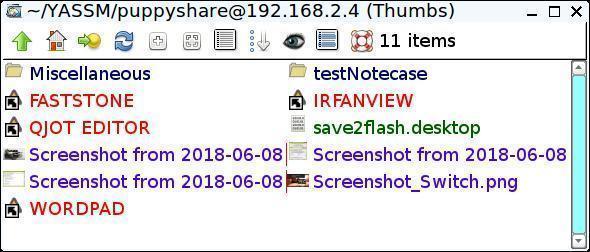
Alternatively, after mounting, leave the GUI closed. Open the YASSM folder found in the Host puppy OS /root directory and click on the MOUNTED puppyshare IP to open, which in this case is puppyshare@192.168.2.4. The 192.168.2.4 is the LAN IP address of the Host which can be determined by running ifconfig in the Host terminal or hovering over the Active Interface icon with the cursor.
You can create more than one share folder at a time as Host and then open them as Guest. Three Host shares are allowed under YASSM, which will be displayed in the Guest ~/YASSM folder. Shares can be unmounted by using the YASSM Samba Share Search window.
3) Configuring other OSes to be a GUEST in SAMBA .
Different operating systems have different approaches .
For Linux Mate (which I run on a Raspberry Pi) and Ubuntu, one needs to navigate to required workgroup folder. The pathway in is Places → Network → Windows Network (folder) → workgroup → <select puppyshare>. The Puppy ID, workgroup and password as determined in part (1) are then required.
For a Raspberry Pi running Raspberian as a Guest one needs to install samba and samba-common-bin. Thankfully, the instructions provided at https://www.raspberrypi.org/magpi/samba-file-server/ seem to work well. To access the Host sharefiles open the Raspberian file manager and add the location of the Host computer using the format smb://<IP address of Host>. For Pi to operate as a Host, one needs to create a SAMBA directory and edit a config file as described in the previous reference.
As a Guest on Windows XP and 7, open My Computer and click on Network Places or My Network Places. The named icons for the shares should appear on the screen. Double click on a share icon to open it. This should bring up a dialogue box requesting a user name and password as listed in the SAMBA Simple Management on the host computer. The shared folder should then open. Should there be a problem, refer to references #2 and #3 below.
I am sure there are other ways that SAMBA can be utilised, which could be the subject of a further article by more experienced users. I hope this article will encourage others to experiment with SAMBA and enjoy the advantages.
References
#1 http://www.murga-linux.com/puppy/viewtopic.php?t=63090
#2 https://docs.google.com/document/d/1ZCqkSVDufXyr3vJAzVjxBlRfHX05hPIrg-nN2Ru-AIg/edit#heading=h.recgdevkqrh7
As the above reference contains an error regarding forward/backward slashes, see also the following:
#3 http://murga-linux.com/puppy/viewtopic.php?p=866579&sid=17b17e20b80ca6d80c3a698b807db0c5
#4 https://docs.google.com/document/d/18HIEGf_MUJ1sebekTQWwvMP9Aw9LVrk2pqr1krkowto/edit
#5 http://murga-linux.com/puppy/viewtopic.php?t=73782
#6 http://www.murga-linux.com/puppy/viewtopic.php?search_id=107536123&t=60204
#7 http://murga-linux.com/puppy/viewtopic.php?t=85606
#8 Samba -Raspberry Pi: https://www.raspberrypi.org/magpi/samba-file-server/
https://www.raspberrypi.org/forums/viewtopic.php?t=196068
https://raspberrypihq.com/how-to-share-a-folder-with-a-windows-computer-from-a-raspberry-pi/
This is a good section to discuss how to compile software. Compiling is not everyone's cup of tea but the more people that can manage it, the longer life Puppy will have.
The hardest part of compiling is the build recipe as there are so many options. Let's include some proven recipes here.
You must have the devx loaded as this is where most of your compiling tools reside. In some cases you may also need to have the kernel sources loaded.
- w_scan
-
Written by smokey01
This month I am going to show you where to obtain the source code for w_scan and how to compile it. You can read how to use it in the tutorials section.
This is the home page for w_scan. Click DOWNLOAD_w_scan to download the source code.
Extract the file you just downloaded.
Enter the directory: w_scan-20170107 and also enter the next directory: w_scan-20170107
Now you should see all the source code.
Open a terminal in the current directory. Press the ` key. It's left of the number 1 key.
Make sure you have the devx loaded. This contains all the development software.
In the terminal type: ./configure --prefix=/usr
When the prompt is returned type: make.
After a short time you should see a binary called w_scan. Copy this file to /usr/local/bin.
That's it job done.
This section is for shell scripts.
- Remasterpup-2018
-
Remasterpup-Auto-2018 developed by forum member nic007
Remastering scripts are nothing new, they've been around for many years but this one is a little different. It doesn't require any input from the user and it's very fast.
Nic007 has released three scripts:
Remasterpup-OptionsA-2018.zip Remasterpup-OptionsA-2018: User input dialog boxes cut down to three (separate zdrv created by default; no first boot welcome and setup screens).
Remasterpup-Options-2018.zip Remasterpup-Options-2018: Full user options (Five streamlined user input dialog boxes).
Remasterpup-Auto-2018.zip Remasterpup-Auto-2018: Fully automated, no user input required.The application will produce a remastered base sfs and a separate zdrv, these should replace your existing base sfs and zdrv. If you don't have an existing zdrv, you have one now.
I gave the Auto script a run the other day and It worked very well. It really has the potential to make anyone an expert.
Read about it here on the Puppy Linux Forums.
Tips & Tricks are simple little actions you can take to make your life easier when using Puppy. You will probably know most of the tips but there are always new users that don't.
Copy & Paste - smokey01
Puppy Package Manager - bigpup
- Copy & Paste
-
Written by smokey01
In Linux it's very easy to copy and paste. Simply highlight the text you wish to copy by left-mouse click and hold while moving the mouse over the text you wish to copy, release mouse button when you are finished copying. To paste, simply press on the scroll wheel button. There are many people that don't realise the scroll wheel has a button, are you one of them? If your mouse does not have a scroll wheel, do yourself a favour and buy one that does. Your computer life will improve dramatically.
As you can see this is much easier than CTRL+C and CTRL+V although this works too.
Copying and Pasting pathnames can be a pain as they can be very long and it's easy to make mistakes it you type them manually. A pathname is simply the path and filename, something like this:
/usr/local/lib/X11/pixmaps/home48.png
The easy way to do this is left-mouse click on the file while holding the CTRL key. You will notice the file or folder will show it's selected. To paste the entire pathname, place the cursor where you wish to paste it and click the scroll wheel button.
- Puppy Package Manager(PPM)
Update Database -
Written by bigpup
The repositories, that are listed in the PPM, have a database of what is in them.
This database is a info file stored in Puppy Linux.
The info in the database file is based on a specific date and time.
Anything that has been added to a repository, after that time and date, is not known to the database.
PPM will not know about the new software that has been added to the repository.
Repositories constantly change as to what is in them.
This is easy to correct if you only remember to do it.
Any time you start PPM.
Go to: configure Package Manager>Update Database>Update Now
This will do a check of the repositories and get updated info on what is in them.
Any programs added, updated, removed, etc......
Now when you check for a program in PPM.
You are getting the latest info on what is in the repositories.
Note:
Many times you can search for a specific program and not find it.
Do a simple database update.
Again search for that program and now it is found.
Especially for newer programs, newer versions, or something totally new to Linux.
The July crossword by greengeek and Wordwinders by 6502coder.
- Crossword
-
Puppy Crossword (July 2018)
(Formatted by greengeek using the "Puzzlefast" website)
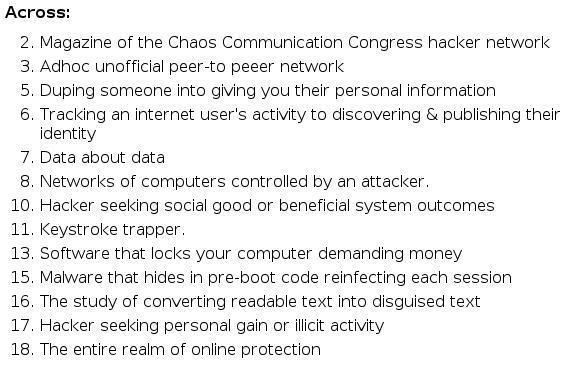
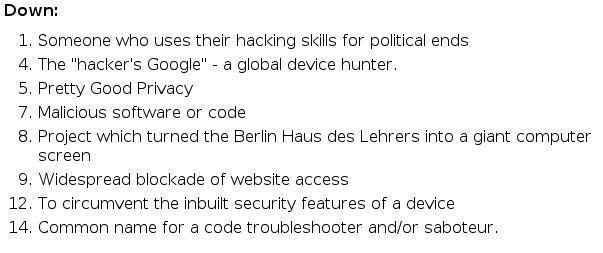
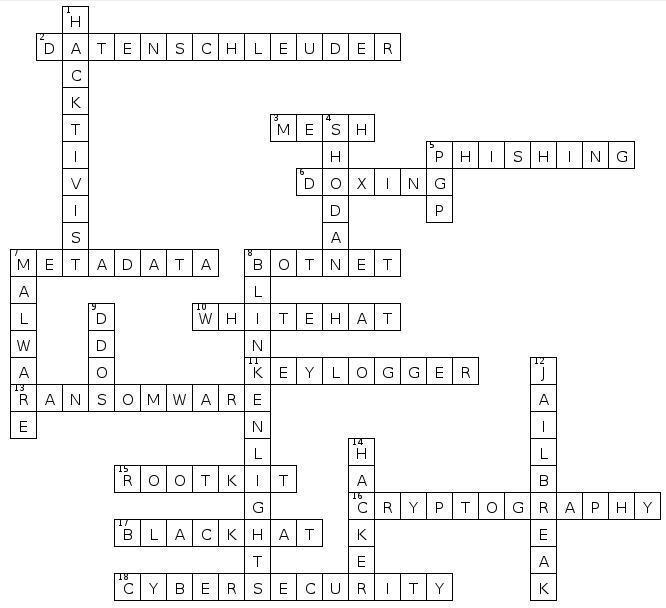
The Hackerverse
"Know thine enemy"
Hacker conferences are held internationally every year. An example is the ChCON coming up in a few weeks time:
https://2018.chcon.nz/
The hacker realm encompasses both good and bad activities. Positives and negatives. We must always be aware of
our vulnerabilities and seek to minimise them. This months crossword peeks into the language of hacking:
(ps: if you have any suggestions for a clue theme/topic for future crosswords please let me know!)
(See clues below image)

Scroll further down for answers:

- Wordwinders
-
Wordwinders
by 6502coder
For each clue there is a word that can be found in the grid.
Each word starts and ends with a letter on the edge of the grid.
Consecutive letters in the word are adjacent vertically, horizontally, or diagonally. The example grid contains the words "several" and "xenial".
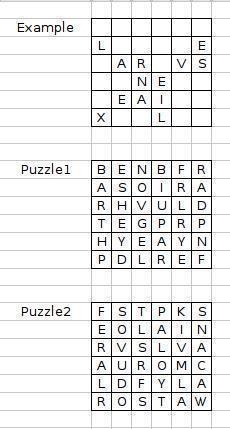
Puzzle 1.
1. The recommended method of installing Puppy.
2. "Reptilian" programming language used by Puppy.
3. The "B" in BASH.
4. Kernel software used to operate a connected device.
5. The "R" in GREP.
Puzzle 2.
1. Linus ___________.
2. Founder of the GNU Project.
3. The Linux version of a Windows shortcut.
4. Student-friendly compiler developed at a Canadian university in the 1960's for a popular mathematical programming language.
5. What the "*" metacharacter in a regular expression is called (or denotes).
Spoiler Alert: answers below.

Puppy Linux Forums USA
Ibiblio repository USA
nluug repository Netherlands
Internode repository Australia
University of Crete repository Greece
aarnet repository Australia
Internet archive repository USA
Puppy Linux Tips by smokey01
Puppy Linux wikka Puppy sites
Bookmarkos provided by kerl
Search the Puppy Linux Forums
Barry Kauler's News Blog
labbe5 Report
Puppy Linux Icon Sets
Not all of the people below have physically given me the information to publish. If I find information I will give the credit where it is due. So if you see your name on the list below please don't be alarmed or upset. You are not losing your mind.
smokey01
greengeek
6502coder
wanderer
fredx181
nic007
SFR
bigpup
Terry Schuster
Proof reading - russoodle
Display tip:
To improve the Notecase display format please press F7 then:
- Tick the "Restore last position/size" checkbox.
- Select the "Display" tab and tick "Wrap text".
Newsletter index written by 6502coder can be found here:
http://www.murga-linux.com/puppy/viewtopic.php?p=945962#945962
Contributions
If you have information you would like to see in the newsletter please email it to smokey01 at smokey01@internode.on.net. I prefer it to be created in Notecase otherwise it makes my job a bit more difficult. I don't intend doing any significant editing but I will attempt to read all of the articles and ask a couple of others to do some proof reading. If you would like to assist in proof reading please let me know on the email address above.
Notecase is very easy to learn and use. Try and keep your articles to less than 1000 words. Photos and images should be no bigger than 1024 x 768. I can always make them smaller.
The deadline for articles is the 20th of each month. Let's not worry about time zones. I know it may be the 20th in Australia and only the 19th in the USA but I can live with this. If it's more than 24 hours late with respect to Australian CST then your article may be pushed right, into the next edition. I expect proof reading to take less than a week which will provide about four days to publish at the beginning of each month.
I will upload the Newsletter to my site at http://smokey01.com/newsletters. There will be two versions. One will be an xz compressed Notecase file and the other will be a html file so it can be read in a browser.
I have changed the original naming convention to 0001-PuppyLinuxNewsletter-Jan2017.ncd.xz and 0001-PuppyLinuxNewsletter-Jan2017.html respectively. The formatting of the html is not brilliant but readable. The newsletter is intended to be downloaded and read in Notecase.
Disclaimer
The editor has the right to veto any articles that he/she considers inappropriate. A reasonable effort will be made to avoid spelling and grammatical errors however, I'm sure some may slip through. This newsletter is published by volunteers, and is free, so please be kind. Constructive criticism and positive suggestions are welcomed.
smokey01